Returning to the (Digital) Darkroom

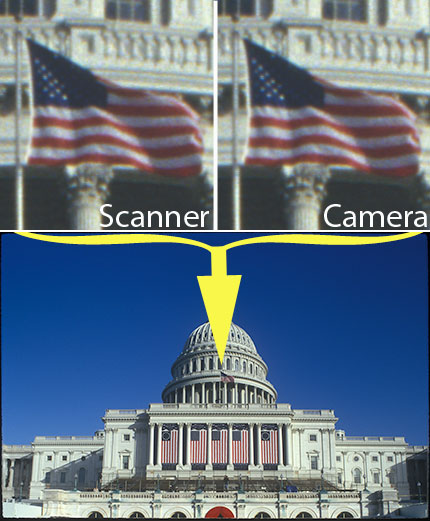
For the past 9 years, I have been engaged in the painstaking process of converting analog images to digital. We've scanned, outsourced, and otherwise processed negatives and slides, from 35mm to 4x5, even a few 6cmx17cm panoramic transparencies. Over time, lt's been a major project. We certainly have been happy with the turnkey results from JaincoTech (Jaincotech, 11/14/07). Yet, with tens of thousands of individual images we wanted to convert, we've looked internally for images that we wanted to scan ourselves.
For several years now, we've used our Nikon LS-8000 scanner. The results it's produced have been great, and in a very automated fashion, albeit limited to 5 35mm slides per tray. Our early tests yielded banding and solarization, which, once we did some research (Luminous Landscape's review, and Bigger Is Sometimes Better article), we learned that those limitations could be overcome by using the multi-pass feature of the scanner (sometimes called the Superfine mode), something that wasn't a problem on the LS-9000 scanner, which addressed that known problem. This scanner yields a 120mb 16bit (I think it's actually 14bit, but who's counting), and delivers as it's baseline file a TIF. The image information in that TIF is deep, so we can go back and correct the digital image after the scanner's auto-exposure/auto-focus efforts. Yet, the serious downside to this process has been that each scan takes about 4 minutes to accomplish.
How to make things faster, and more efficient?
With the arrival of our Nikon D3 and Canon EOS 1Ds Mark III camera last December (Nikon vs. Canon - Introduction), we revisited our options. The Canon has as it's file size from it's chip, an image comparable in pixels to the LS-8000. Again, a 60+ mb file, with a substantial bit depth. Surely, the D3 would produce amazing results too, but we're testing the Mark III because it's native file size is comparable to our scanner. Further, you may well not need a 60mb native file - instead, a 36mb native file is probably perfectly fine, and easily up-sizable to whatever size you'd need. This isn't about Canon vs. Nikon, both work for this project. Next, we began looking into macro lenses. Across the board, the 65mm 1:1 macro lens
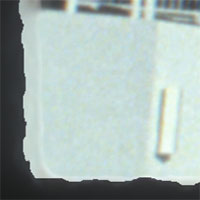 Since almost all my images are mounted slides, this isn't an issue for me, but if you wanted to be able to pull back 1 to 2 mm to capture that film area, you might choose a different lens. However, I can see the rounded corners of the slide mounts I am copying, and since I am not un-mounting slides to digitize them, this lens is just the right choice for me. (note the corner, viewed here as a 100% view, shows even the rough edge of the paper mount, so magnified. Also note - it's an extremely sharp/defined edge, thus, in focus!)
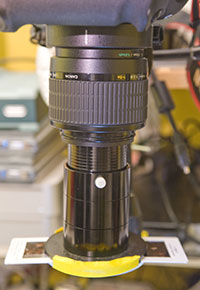 Content with the camera and lens choice, we needed an adapter. A little research yielded the Extend-a-Slide (PhotoSolve - Xtend-a-Slide), a machined aluminum, black anodized device that, for it's simplicity, is really well engineered. It works with step-up rings, on most any macro lens. On it's front, you can mount a magnetic adapter for strips of negatives, individual mounted slides, or a speed-loader for multiple mounted slides. On top of that, what you might first consider to be a cheap locking device - the nylon screw which locks the slide in place, is actually well considered. If there was a metal screw, the force of locking the slide would create a metal marring of the inside tube, and so, with the clearances these tubes have, that would be a problem, so the nylon screw is actually a good thing, and moreover, very strong. There are other solutions, most more expensive, some much more expensive. Peter Krogh discusses his solution - Scans and Camera Scans - Camera Scan Sample - over at the DAM Forum. I had the opportunity to look at Peter's rig, and it's hard core - definitely a rock-solid solution as well.
With those issues solved, I thought I was set. Yet, issues like slide mount depth, and proper framing, meant I had to actually look through the lens, and, with my naked eye, judge focus and framing/alignment. Not good. The naked eye, without any magnification, can get it close, but not perfect. Certainly not like we used to when mounting a negative in an enlarger and using a grain focuser, back in the day.
Enter Liveview. Now, this isn't unique to Canon, Nikon has it as well (On both the D3, and D300, as reviewed here). And, since I am manually focusing, any limitations like auto-focus not being active in liveview isn't an issue. However, I am tasked with looking at the screen on the back of the camera, and using that screen to judge. Not ergonomically the best with the camera mounted looking down, much like an old enlarger (for ease of sliding the images in and out, a la a darkroom set up), and the screen on the back of the camera is a bit small.
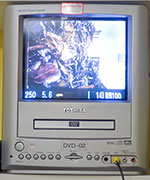 However, by utilizing the camera's external video jack, I can plug in a TV monitor to it, and voila! I can see my image on a large screen (I have chosen a 7" one as more than enough). Note, we're not using the abillity to see the liveview on the computer screen, as there is a mico-lag in the time from focus change to the affect appearing on the screen, so we're using the external video jack for immediate response times, as if it was on the back of the camera. This is certainly better than my naked eye in the viewfinder, and also better than the small LCD on the back of the screen. In order to best see the image,
 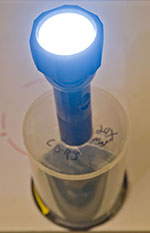 I place a maglite 3D-cell flashlight (in an empty CD spindle) below the mount, and now I am looking at a brightly lit image on the screen, and I just remove the flashlight before I make the exposure, a move that is familiar, my muscle memory remembers the placement and removal of the 10x grain focuser I would place and remove from the easel when printing negatives. Yet, I am only seeing the image full frame.
Both Nikon and Canon allow you to zoom in when using liveview. On Nikon, once in liveview, pressing the magnifying glass button on the left of the camera, along with the thumbwheel allows you to zoom in deep into the image, a two-fingered maneuver, but easy to do. On the Canon, simply pressing the button in the center of the back wheel engages liveview, and the "+" magnifier button allows you to jump to 5x, and then 10x, to see, very critically, your image. Looking at the image, and then making a minute adjustment to the lens, I saw the grain of the image snap in, and was immediately struck with the memory of watching the grain snap into focus when looking into that old school grain focuser. It was surely a familiar feel, I almost felt giddy with the nostalgic feel.
Further, liveview allowed me to properly center and straighten the image, when I was in full-frame liveview (i.e. not magnified), and the camera was set at iso100, f5.6, 1/250th, and with the flash at 1/2 power and the camera set to flash color balance, I am now getting amazing results. Where my focus point of a specific image isn't in the center, both cameras have joystick capabilities to navigate to the best position in the image, however, even when not zoomed in to that point, you can see the grain in focus elsewhere in the image are. Now, I am capturing these images at 4x a minute, rather than 1 every 4 minutes, a 16x speed increase. Since I am only copying properly exposed images, I don't want to use the camera/flash auto-exposure feature, so the flash is on manual. Capturing in RAW, I actually have better latitude with image information than I did with the scanner.
Lastly, the camera is connected to a computer, so the images are streamed straight to a hard drive. Once viewable in the Image Browser software, I am able to rename the original RAW file with a more meaningful file name. In post production, we'll convert this image to a DNG, applying any corrections, and embed our metadata, all in the neat wrapper that is DNG.
It was very nostalgic to have that "darkroom" feel to the process. To see the image grain, to re-experience the placement of the grain-focuser (now the illuminating flashlight), and the removal of the image, before triggering the shutter and converting, once and for all, my analog images into digital.
I am not suggesting you go out and get these cameras to do your own copywork. I am also saying you an do this with either the D3 or the EOS 1Ds Mark III (or any camera with liveview). But if you're looking for reasons to get the camera with these capabilities, and then put them to good use when you're not using them for an assignment, this is an excellent way to leverage these tools when they would otherwise be sitting on a shelf.
Now, we can finalize the conversion of our analog images, and allow us to monetize those images that have been languishing in filing cabinets, not being seen by clients.
Please post your comments by clicking the link below. If you've got questions, please pose them in our Photo Business Forum Flickr Group Discussion Threads.

7 comments:
Its. Its its its.
I suppose this solution works well for 35mm negs, but what about larger formats? I would think there would be a loss of detail as the film size increased.
I'm guessing medium format shooters could assemble a similar setup using their body and digital back of choice? Of course, at that price point, the Flextight scanners seem reasonable.
At $5k for a D3 and $8k for a 1DsMK3, that's a significant investment when compared to either the LS-9000, Epson V750, or Creo CCD scanners.
Still, it's an interesting experiment.
Timothy --
I did outsource all of my medium format images, because of the time involved relative to the handling of a mounted 35mm, which is why this post was all about 35mm.
In addition, it's not about buying the D3/Mark III for this, as noted, it's about using that gear when it's not working on assignment (or even the D300 for that matter), and perhaps a justification for getting, say, a D300 instead of a D70, or getting the Mark III over say another camera.
Thanks,
John
THANKS JOHN - Your a day late - I bought a coolscan yesterday.
Most stores have a 14 or 30 day return policy.
:-)
-- John
BTW, if anyone is tasked with getting LOTS of negs scanned,
the directest optimization is to use 2 scanners in parallel,
or, at most, 3 or 4. ( gets confused, after that )
( I'm thinking of thousands of negs,
possibly hundreds of '000s some have in archives,
and places like local heritage libraries... )
Cheers
会社設立
クレジットカード 海外旅行保険
結婚指輪
育毛剤
薬剤師 求人
ワンクリック詐欺
債務整理
toefl
個別指導塾
幼児教室
合宿 免許
名刺
Post a Comment